
1. Bottom line first: Windows can lead, but cannot own everything
Direct answer to the title: in 2026, you cannot complete "full" iPhone app development and App Store release in a pure Windows environment—not a skills gap, but a hard boundary in Apple's toolchain. You can let Windows carry 70%+ of daily work and hand macOS-only steps to a cloud Mac or shared team Mac. From the user's perspective, it still feels like a smooth Windows workflow.
| Stage | Windows only? | Notes |
|---|---|---|
| Write Swift / Dart / TS code, Git, code review | ✅ Yes | VS Code, Cursor, Android Studio work fully on Windows |
| Enroll in Apple Developer, App Store Connect ops | ✅ Yes | Browser-only: metadata, screenshots, review communication |
| Launch iOS Simulator, SwiftUI previews | ❌ No | Simulator is an Xcode component, macOS only |
xcodebuild, CocoaPods/SPM resolution, Archive | ❌ No | Requires macOS + Xcode |
| Keychain signing, Provisioning Profile | ❌ No | Distribution certificate private key lives in macOS Keychain |
| Upload .ipa to TestFlight / App Store | ⚠️ Indirectly | Transporter / fastlane need macOS; cloud Mac CI can upload |
| On-device debugging (USB to iPhone) | ❌ No | Mac must recognize device and install provisioning profile |
2. Why doesn't Apple bring Xcode to Windows?
This is not simply "Apple making life hard for Windows users." The iOS toolchain is deeply tied to:
- macOS Keychain: code-signing private keys, developer certificates, and push certificates live in system-level secure storage. Windows has no equivalent Apple-accepted alternative.
- iOS Simulator: built on macOS virtualization and the Metal graphics stack to emulate iPhone/iPad models and iOS versions—cannot be legally distributed on Windows.
- Unified build environment: App Store review expects Release packages from official tooling.
codesign,notarytool(macOS software notarization), and related CLI tools ship only with the macOS SDK. - Apple Silicon optimization: Xcode in 2026 is fully optimized for ARM. Running macOS in a VM on x86 Windows violates the EULA, and Simulator plus SwiftUI previews are nearly unusable.
So searches for run xcode on windows or ios simulator windows mostly surface outdated tutorials or Hackintosh setups—for teams that need a legitimate App Store release, long-term risk far exceeds renting a cloud Mac.
3. Four common paths: which can actually ship?
| Approach | Can ship? | 2026 assessment |
|---|---|---|
| macOS in a Windows VM (Hackintosh) | Theoretically, very unstable | Violates EULA; poor Simulator/Metal experience; not production-ready |
| GitHub Actions macOS Runner only | Yes, but "unattended build" bias | Fixing signing, downloading Simulator runtimes, Organizer debugging is awkward |
| Buy a Mac mini for the desk | Yes | High cost; low utilization for teams shipping a few times a year |
| Windows + cloud Mac (SSH/VNC) | ✅ Recommended | Pay by day, interactive, deep IDE integration |
For "build iOS without a Mac" details, see how to build iOS apps on Windows in 2026; near release, pair with the complete Windows iOS App Store release guide.
4. Recommended 2026 architecture: Windows workstation + cloud Apple Silicon
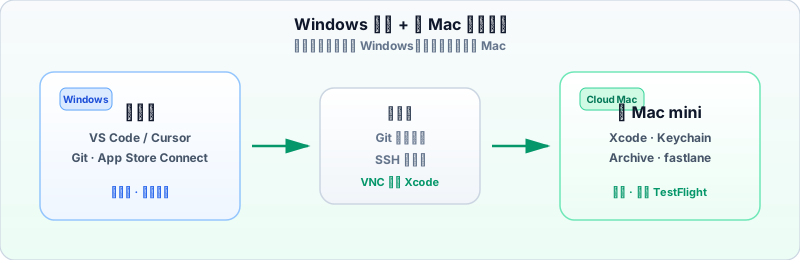
A reusable architecture:
- Windows local layer: Cursor / VS Code for code, Git PRs, Figma for screenshots, browser for App Store Connect.
- Connection layer: SSH for
xcodebuild,flutter build ipa; VNC for Xcode GUI, Simulator, Organizer. - Cloud Mac layer: pinned Xcode version, Keychain, CocoaPods cache, DerivedData as the dedicated "iOS build machine."
- Distribution layer: Archive → TestFlight → review → regional release; metadata in Connect, package uploaded from cloud Mac.
Flutter / React Native teams can keep Android and Web on Windows and switch to cloud Mac only for iOS builds—see the complete Flutter remote Mac development guide.
5. Phase one: how far can you develop on Windows?
Native Swift / SwiftUI
You can write Swift syntax in VS Code with plugins on Windows, but you won't get Xcode completion, SwiftUI previews, or project templates. In practice, teams use Remote-SSH to open .xcodeproj / .xcworkspace on the cloud Mac—edit on the Windows screen, compile and index remotely.
Flutter / React Native / KMP
Cross-platform frameworks decouple business code from the platform:
- On Windows:
flutter run -d chrome, Android device debugging, RN Metro bundler, unit tests. - On cloud Mac:
pod install,flutter build ios, fixios/native config, handle entitlements.
6. Phase two: iOS Simulator—must run on Mac, but you can view remotely
Windows cannot install or run iOS Simulator locally. It ships with Xcode, supports multiple device models and iOS versions, partial network and push simulation—it is the main UI debugging tool after physical devices.
Practical steps for remote Simulator use
- On cloud Mac, install the target iOS Simulator Runtime (Xcode → Settings → Platforms).
- Connect via VNC or Apple Screen Sharing, pick a Simulator target in Xcode,
Cmd + Rto run. - With stable network, 60fps remote display is workable for daily dev in 2026; record complex animations locally if needed.
- CLI equivalent:
xcrun simctl listfor devices,xcrun simctl bootto start, pair withxcodebuildfor UI tests.
When do you need a physical device?
- Bluetooth, NFC, ARKit, some sensors, performance profiling
- End-to-end push notification validation, Sign in with Apple on device
- Final smoke test on target iOS version before release
On-device debugging needs Mac USB to iPhone (or wireless debugging with the same Apple ID). With cloud Mac, ship a test device to a colleague with access, or use TestFlight external testing for some device-only checks.
7. Phase three: code signing—the step Windows users hit hardest
Signing binds your app to a developer identity Apple trusts. Without valid signing, Simulator runs—but you cannot install on others' devices or upload to the App Store.
Three things you need
- Apple Developer Program account (individual or organization—confirm on Apple's site)
- Distribution certificate (private key + certificate in cloud Mac Keychain)
- Provisioning Profile (binds App ID, certificate, and Capabilities)
Recommended signing workflow (on cloud Mac)
- Xcode → Settings → Accounts, sign in with Apple ID, select Team.
- Project Target → Signing & Capabilities, check Automatically manage signing, or pick Distribution Profile manually.
- First release: Development certificate + dev profile for device debugging; App Store release uses App Store Distribution certificate + App Store Profile.
- CI: create API Key (.p8) in App Store Connect, use fastlane
matchor a cert repo—avoid manual p12 exports per person.
For multi-region teams sharing one cloud Mac, govern certificates and profiles—see iOS signing and provisioning governance on multi-region cloud Mac FAQ.
8. Phase four: Archive, TestFlight, and App Store release
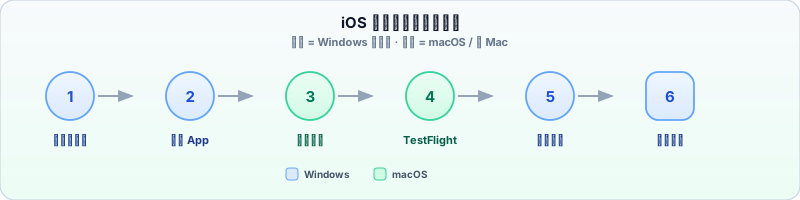
8.1 Archive and upload (cloud Mac)
In Xcode, select Any iOS Device (arm64), Product → Archive. In Organizer, Distribute App → App Store Connect → Upload. CLI equivalent:
xcodebuild -workspace MyApp.xcworkspace \
  -scheme MyApp \
  -configuration Release \
  -archivePath build/MyApp.xcarchive archive

xcodebuild -exportArchive \
  -archivePath build/MyApp.xcarchive \
  -exportPath build/export \
  -exportOptionsPlist ExportOptions.plist
Or fastlane gym + pilot for one-shot TestFlight upload. Trigger scripts over SSH from Windows—no local Xcode install needed.
8.2 TestFlight (Windows browser + cloud Mac upload)
After the build appears in App Store Connect → TestFlight:
- Add internal/external testers, view crashes and feedback in Windows browser
- Complete export compliance and encryption declarations
- Validate login, payments, push, deep links on critical paths
8.3 Submit for review and release (Windows browser)
Pick a build version, fill review notes, demo account, privacy policy URL, age rating, submit for review. If rejected, read Guideline references in Resolution Center, update metadata or re-Archive on cloud Mac. After approval, choose manual or automatic release by country and region.
9. End-to-end workflow (week by week)
Starting from zero with Windows daily driver + cloud Mac—a workable 2026 timeline:
| Week | Tasks | Environment |
|---|---|---|
| Week 1 | Enroll in Apple Developer; create Bundle ID; provision cloud Mac, install Xcode | Windows browser + cloud Mac |
| Weeks 2–3 | Code on Windows/Cursor; Git push; cloud Mac pod install, Simulator integration | Windows + SSH/VNC |
| Week 4 | Configure signing; device or Simulator regression; fix Info.plist permission strings | Cloud Mac primary |
| Week 5 | Create App in App Store Connect; screenshots and description; Archive → TestFlight | Windows + cloud Mac |
| Week 6 | External test bug fixes; submit for review; monitor crashes and sales after release | Windows browser |
10. Tool checklist: what to install on Windows vs cloud Mac
| Tool | Windows | Cloud Mac |
|---|---|---|
| Cursor / VS Code + Remote-SSH | ✅ | SSH server |
| Git, GitHub / GitLab | ✅ | ✅ |
| Xcode + iOS Simulator | — | ✅ |
| CocoaPods / Homebrew | — | ✅ |
| fastlane, Transporter | — | ✅ |
| Figma / screenshot tools | ✅ | Optional |
| App Store Connect (browser) | ✅ | ✅ |
11. Five myths (highest trap rate)
- "There's a Windows iOS Simulator online" — mostly old demos or reskinned Android emulators; cannot replace Xcode Simulator or produce shippable builds.
- "Debug build runs, so I can submit" — review needs Release + correctly signed Archive; Debug config and certs are non-compliant.
- "CI only, never log into cloud Mac" — first-time Capability setup, Profile mismatch fixes, new Simulator runtime downloads need an interactive macOS desktop.
- "Sign once, valid forever" — certs expire, profiles miss devices, new App ID Capabilities need regeneration; use fastlane match or documented process.
- "Store listing can wait until after release" — missing privacy policy URL, permission strings, or demo account causes direct rejection; complete on Windows during TestFlight.
12. Pre-release checklist (printable)
- Apple Developer Program active; Bundle ID matches project
- Cloud Mac has target Xcode version; Simulator Runtimes installed
- Distribution certificate and App Store Profile valid; Capabilities match project
- Archive is Release; version number follows increment rules
- Build uploaded to TestFlight; export compliance and encryption declarations complete
- Screenshots, description, privacy labels, demo account, review notes ready
- Known crashes fixed; critical paths verified on Simulator or device
13. Run your first Windows → iPhone pipeline with vpszap
For Windows teams, buying a Mac just to ship a few times a year rarely pays off. A pay-by-day dedicated Apple Silicon Mac mini fits "dev + release window" better: enable SSH/VNC, pin Xcode and signing environment, Simulator or Archive, then shut down. vpszap offers multi-region nodes (Singapore, Tokyo, Seoul, Hong Kong, US East, US West) with daily billing—aligned with "Windows codes, Mac does iOS-only work."
Validate the full pipeline once: pick your nearest region → SSH in → install Xcode → import certificates → run Archive → upload TestFlight. If latency and disk meet your needs, standardize as team release environment. Learn about vpszap cloud Mac mini or see pricing and plans.
14. Summary
In 2026, "Windows only" cannot replace macOS in the iOS toolchain—Simulator, signing, and Archive have no legal Windows alternative. But "Windows as primary driver from development to App Store release" is fully viable: keep code and store ops on Windows, put Apple-only steps on cloud Mac, connect with SSH/VNC and Git—the best cost/risk balance for the full workflow today.
If you remember only three things:
- Windows can write and manage the store; it cannot run Simulator or sign locally.
- Cloud Mac is not optional—it is the dedicated "build machine" for iOS delivery.
- Follow this checklist for your first release—it beats buying a Mac mini that collects dust.
